In this article, I will show you how to open and block ports through the Ubuntu’s default firewall, UFW. Let’s get started.
Installing UFW on Ubuntu:
UFW firewall software should be installed on Ubuntu desktop and server operating systems by default. If UFW is not available in your Ubuntu machine, you can easily install it as it is available in the official package repository of Ubuntu. First, update the APT package repository cache with the following command:
Now, install UFW with the following command:
UFW should be installed. As you can see, in my case, it’s already installed.

Activating UFW on Ubuntu:
Even if UFW is installed already, it may not be active on your Ubuntu machine. In this section, I will show you how to activate UFW on Ubuntu. First, check whether the UFW service is running with the following command:
As you can see, UFW service is running.

If UFW service is not running, you should be able to start it with the following command:

By default, UFW is inactive on Ubuntu. So, you have to manually activate UFW.
You can check whether UFW is active or not with the following command:
As you can see, UFW is inactive.

To active the UFW, run the following command:
UFW should be activated.

Allow and Block Ports Using App Profiles:
With UFW, you can allow or block ports using App profiles. For example, let’s say you want to allow or block the port 80, which is the default port for Apache web server. Instead of telling UFW to allow or block port 80, you can just tell it to block the Apache app profile. That’s a really nice feature of UFW firewall.
You can list all the UFW supported app profiles with the following command:

As you can see, the available app profiles are listed. An interesting thing here is that only the apps installed on your Ubuntu machine are listed. If any app profile is not available here, don’t worry. Once you install the software package, the UFW profile of that app should also be installed and it should appear here.

Now, you can allow ports of an app profile (let’s say Apache) with the following command:
As you can see, the required firewall rules to allow the ports defined in the Apache app profile are added.

You can see what ports are allowed and what ports are blocked with the following command:
As you can see, the ports in the Apache app profile are allowed.

You can also block ports using the App profiles.
To block the ports of an app profile (let’s say Apache), run the following command:
As you can see, the required rules for blocking the ports defined in the Apache app profile are added to the UFW firewall.

As you can see, the ports defined in the Apache app profile are blocked.

Finding Out Affected Ports of UFW App Profiles:
If you don’t know what ports an app profile allows or blocks, you can find it out very easily. For example, to see what ports the Apache app profile allows or blocks, run the following command:
As you can see, the Apache app profile allows or blocks the TCP port 80.

You can also find out the same information by reading the configuration file of app profiles. The configuration files are in the /etc/ufw/applications.d/ directory. You can list all the installed UFW profiles configuration files with the following command:
As you can see, there a configuration file apache2-utils.ufw.profile for the Apache UFW profiles.

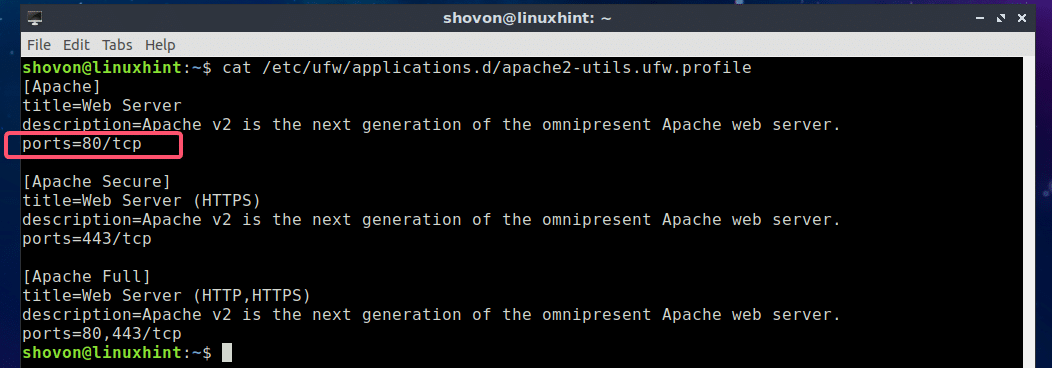
Now, open the apache2-utils.ufw.profile configuration file with the following command:
As you can see, the Apache app controls firewall rules for the TCP port 80.

The reason I also showed you the manual process is that you can see how easy it is to configure your own custom app profile if needed. The configuration files are really simple and self-explanatory.
Allow and Block Ports Using Port Number:
If you don’t want to use any app profiles, just want to allow or block ports using the traditional way (using the port numbers), then this section is for you. With UFW, you can also allow or block ports using the port number.
For example, to allow the TCP port 8080 using UFW, run the following command:
The required firewall rules for allowing the TCP port 8080 should be added.

As you can see, the TCP port 8080 is allowed.

Again, to block the UDP port 4444, run the following command:
The required firewall rules for blocking the UDP port 4444 should be added.

As you can see, the UDP port 4444 is blocked.

You can also allow the TCP and UDP port (let’s say 2322) at the same time with the following command:
The same way, you can block the TCP and UDP port (let’s say 4514) at the same time with the following command:
So, that’s how you allow and block ports using UFW on Ubuntu. Thanks for reading this article.

