How YUM Works
The configuration file for Yum is stored in the /etc/ directory, a file named yum.conf. This file can be configured and tweaked to suit certain needs of the system. Below is a sample of the contents of the yum.conf file:
cachedir=/var/cache/yum/$basearch/$releasever
keepcache=0
debuglevel=2
logfile=/var/log/yum.log
exactarch=1
obsoletes=1
gpgcheck=1
plugins=1
installonly_limit=5
This configuration file could be different from whatever you may get on your machine, but the configuration syntax follows the same rules. The repository of packages that can be installed with Yum are usually saved in the /etc/yum.repos.d/ directory, with each *.repo file in the directory serving as repositories of the various packages that can be installed.
The image below shows the structure of a CentOS base repository:

YUM works in a pattern similar to all Linux commands, using the structure below:
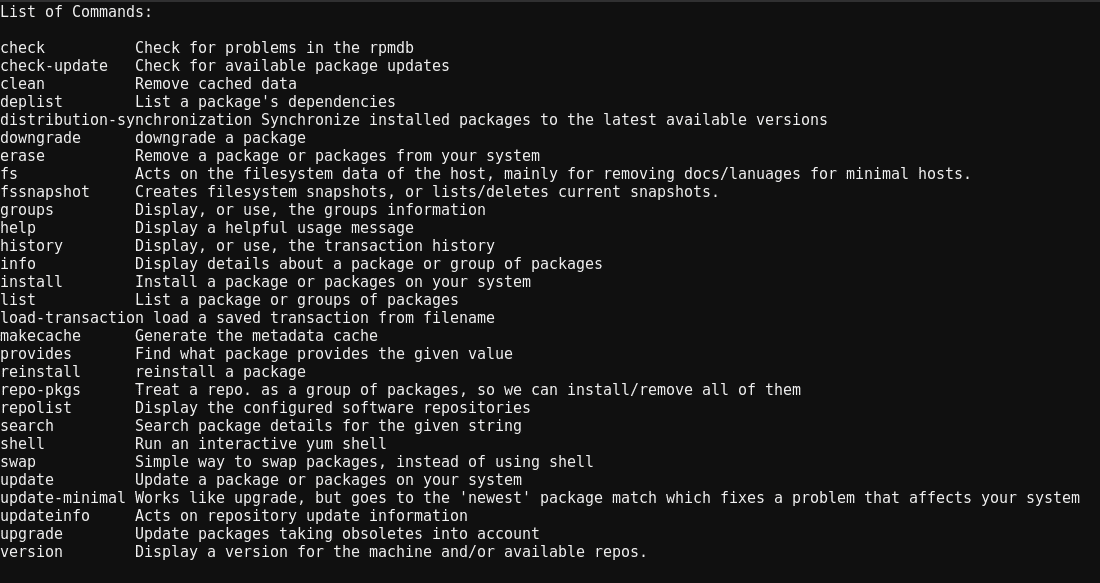
With the command above, you can carry out all necessary tasks with YUM. You can get help on how to use YUM with the –help option:
You should get a list of the commands and options that can be run on YUM, just as seen in the images below:

List of commands

List of options
For the rest of this article, we would be completing a couple of tasks with Yum. We would query, install, update and remove packages.
Querying packages with YUM
Let’s say you just got a job as a Linux system administrator at a company, and your first task is to install a couple of packages to help make your tasks easier such as nmap, top etc.
To proceed with this, you need to know about the packages and how well they will fit the computer’s needs.
Task 1: Getting information on a package
To get information on a package such as the package’s version, size, description etc, you need to use the info command.
As an example, the command below would give information on the httpd package:
Below is a snippet of the result from the command:
Arch : x86_64
Version : 2.4.6
Release : 80.el7.centos.1
Task 2: Searching for existing packages
It is not in all cases you would know the exact name of a package. Sometimes, all you would know is a keyword affiliated with the package. In these scenarios, you can easily search for packages with that keyword in the name or description using the search command.
The command below would give a list of packages that have the keyword “nginx” in it.
Below is a snippet of the result from the command:
munin-nginx.noarch : NGINX support for Munin resource monitoring
nextcloud-nginx.noarch : Nginx integration for NextCloud
nginx-all-modules.noarch : A meta package that installs all available Nginx module
Task 3: Querying a list of packages
There are a lots of packages that are installed or are available for installation on the computer. In some cases, you would like to see a list of those packages to know what packages are available for installation.
There are three options for listing packages which would be stated below:
yum list installed: lists the packages that are installed on the machine.
yum list available: lists all packages available to be installed in from enabled repositories.
yum list all: lists all of the packages both installed and available.
Task 4: Getting package dependencies
Packages are rarely installed as standalone tools, they have dependencies which are essential to their functionalities. With Yum, you can get a list of a package’s dependencies with the deplist command.
As an example, the command below fetches a list of httpd’s dependencies:
Below is a snippet of the result:
dependency: /bin/sh
provider: bash.x86_64 4.2.46-30.el7
dependency: /etc/mime.types
provider: mailcap.noarch 2.1.41-2.el7
dependency: /usr/sbin/groupadd
provider: shadow-utils.x86_64 2:4.1.5.1-24.el7
Task 6: Getting information on package groups
Through this article, we have been looking at packages. At this point, package groups would be introduced.
Package groups are collection of packages for serving a common purpose. So if you want to set up your machine’s system tools for example, you do not have to install the packages separately. You can install them all at once as a package group.
You can get information on a package group using the groupinfo command and putting the group name in quotes.
The command below would fetch information on the “Emacs” package group.
Here is the information:
Group-Id: emacs
Description: The GNU Emacs extensible, customizable, text editor.
Mandatory Packages:
=emacs
Optional Packages:
ctags-etags
emacs-auctex
emacs-gnuplot
emacs-nox
emacs-php-mode
Task 7: Listing the available package groups
In the task above, we tried to get information on the “Emacs” package. However, with the grouplist command, you can get a list of available package groups for installation purposes.
The command above would list the available package groups. However, some packages would not be displayed due to their hidden status. To get a list of all package groups including the hidden ones, you add the hidden command as seen below:
Installing packages with YUM
We have looked at how packages can be queried with Yum. As a Linux system administrator you would do more than query packages, you would install them.
Task 8: Installing packages
Once you have the name of the package you like to install, you can install it with the install command.
Example:
Task 9: Installing packages from .rpm files
While you have to install most packages from the repository, in some cases you would be provided with *.rpm files to install. This can be done using the localinstall command. The localinstall command can be used to install *.rpm files either they are available on the machine or in some external repository to be accessed by a link.
Task 10: Reinstalling packages
While working with configuration files, errors can occur leaving packages and their config files messed up. The install command can do the job of correcting the mess. However, if there is a new version of the package in the repository, that would be the version to be installed which isn’t what we want.
With the reinstall command, we can re install the current version of packages regardless the latest version available in the repository.
Task 11: Installing package groups
Earlier, we looked into package groups and how to query them. Now we would see how to install them. Package groups can be installed using the groupinstall command and the name of the package group in quotes.
Updating packages with YUM
Keeping your packages updated is key. Newer versions of packages often contain security patches, new features, discontinued features etc, so it is key to keep your computer updated as much as possible.
Task 12: Getting information on package updates
As a Linux system administrator, updates would be very crucial to maintaining the system. Therefore, there is a need to constantly check for package updates. You can check for updates with the updateinfo command.
There are lots of possible command combinations that can be used with updateinfo. However we would use only the list installed command.
A snippet of the result can be seen below:
FEDORA-EPEL-2016-0cc27c9cac bugfix lz4-1.7.3-1.el7.x86_64
FEDORA-EPEL-2015-0977 None/Sec. novnc-0.5.1-2.el7.noarch
Task 13: Updating all packages
Updating packages is as easy as using the update command. Using the update command alone would update all packages, but adding the package name would update only the indicated package.
yum update : to update all packages in the operating system
yum update httpd : to update the httpd package alone.
While the update command will update to the latest version of the package, it would leave obsolete files which the new version doesn’t need anymore.
To remove the obsolete packages, we use the upgrade command.
yum upgrade : to update all packages in the operating system and delete obsolete packages.
The upgrade command is dangerous though, as it would remove obsolete packages even if you use them for other purposes.
Task 14: Downgrading packages
While it is important to keep up with latest package updates, updates can be buggy. Therefore in a case where an update is buggy, it can be downgraded to the previous version which was stable. Downgrades are done with the downgrade command.
Removing packages with YUM
As a Linux system administrator, resources have to be managed. So while packages are installed for certain purposes, they should be removed when they are not needed anymore.
Task 15: Removing packages
The remove command is used to remove packages. Simply add the name of the package to be removed, and it would be uninstalled.
While the command above would remove packages, it would leave the dependencies. To remove the dependencies too, the autoremove command is used. This would remove the dependencies, configuration files etc.
Task 15: Removing package groups
Earlier we talked about installing package groups. It would be tiring to begin removing the packages individually when not needed anymore. Therefore we remove the package group with the groupremove command.
Conclusion
The commands discussed in this article are just a little show of the power of Yum. There are lots of other tasks that can be done with YUM which you can check at the official RHEL web page. However, the commands this article has discussed should get anybody started with doing regular Linux system administration tasks.


