How to Disable SELinux on CentOS 7
The full name of SELinux is Security-Enhanced Linux. It is a security feature of Linux built into the Linux kernel. It is used to control access to users, files, network resources and applications of a Linux system. SELinux provides extended file system permissions on top of the traditional Linux filesystem permission known as Discretionary Access Control (DAC).
SELinux is a good security feature. But it is hard to understand and maintain. That is why small companies and startups often don’t bother with SELinux. CentOS 7 and Red Hat Enterprise Linux 7 (RHEL 7) comes with SELinux pre-installed.
In this article, I will show you how to disable SELinux on CentOS 7. Let’s get started.
Modes of SELinux
SELinux has 3 states or modes. They are enforcing, permissive, and disabled.
enforcing mode: In enforcing mode, SELinux security policy is enforced. In this mode, SELinux is enabled and its policy is in effect. That means the things that SELinux won’t allow, won’t be allowed.
For example, if an application is configured to run on a specific port by default, let’s say port 80, and you change the port to something else, let’s say port 81, you will also have to configure SELinux to allow the application to run on port 81. If you don’t, then in enforcing mode, SELinux won’t let the application run at all.
permissive mode: In permissive mode, SELinux is enabled. But the SELinux policy is not enforced. That is, SELinux will allow whatever an application is trying to do. So how does this help? Well, when SELinux is in permissive mode, it will log whatever not allowed by SELinux policy.
disabled mode: In disabled mode, SELinux is disabled. No SELinux policy is loaded by the operating system.
If your operating system comes with SELinux pre-installed as in the case for CentOS 7 and RHEL 7, SELinux is set to enforcing mode by default.
Checking the Current Status & Mode of SELinux
If you have SELinux installed, you may want to know whether SELinux is on and which mode it is in. It is pretty straightforward.
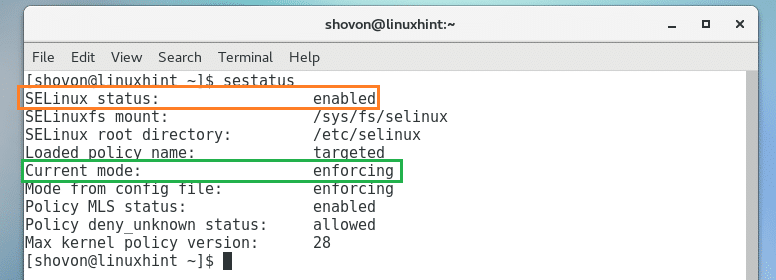
Run the following command to check the current status & mode of SELinux:

As you can see in the screenshot below, the orange marked section says SELinux status is enabled. The green marked section says that the Current mode is enforcing.
Temporarily Disable SELinux on CentOS 7
You may require SELinux to be enabled. But if you try to test or configure new applications in your CentOS 7 operating system while SELinux is enabled, even the right configuration may not work.
For example, if you have Apache web server installed, the default web root is /var/www/html. If you have SELinux enabled, and you try to change it to something else, Apache web server won’t start unless you reconfigure SELinux.
In situations like this, you may want to disable SELinux temporarily. But SELinux can’t be disabled without a system reboot. You may consider changing SELinux mode to permissive. That way SELinux policy won’t be enforced, which is kind of the same as disabling SELinux. When you’re done, you can set SELinux to enforcing mode again.
You can run the following command to set SELinux to permissive mode temporarily:

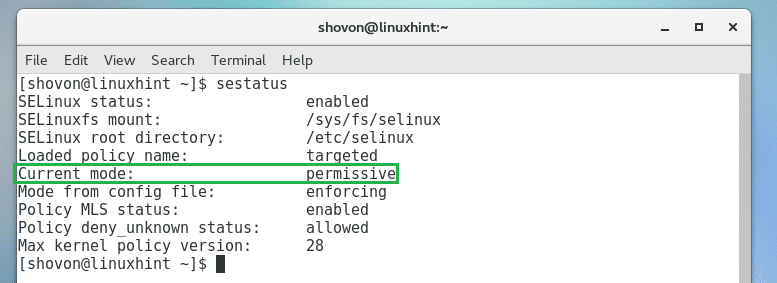
Now run the following command to check the current mode of SELinux:
As you can see in the marked section of the screenshot below, SELinux is set to permissive mode.
You can run the following command to switch it back to enforcing mode:

Permanently Disable SELinux on CentOS 7
You may permanently disable SELinux on CentOS 7 if you want.
Run the following command to edit /etc/selinux/config SELinux configuration file:

You should see the following window. Now change SELINUX=enforcing as marked in the screenshot below to SELINUX=disabled
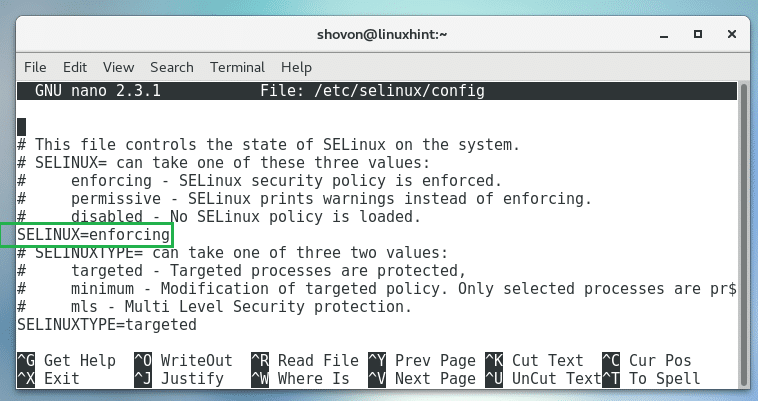
The final configuration should look like this:
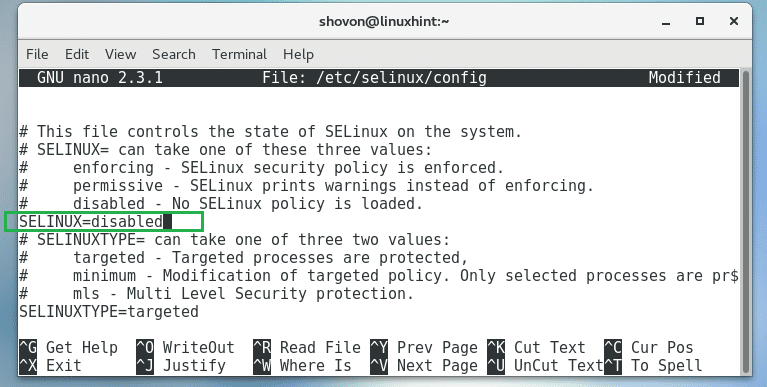
Now press <Ctrl> + x and then press y and then press <Enter> to save the file.
Now reboot your computer with the following command:

Once your computer starts, check the status of SELinux again with the following command:
As you can see in the marked section of the screenshot below, SELinux status is disabled.

That’s how you disable SELinux on CentOS 7. Thanks for reading this article.
