Multi-monitors are used to give you freedom of control when you are working on more than one task, all of which require full visibility. Connecting your Linux system to a larger display would give you the benefit of more surface area on which to display more tasks simultaneously. Once you get into the habit of using this feature in the right way to increase productivity, you wouldn’t want to abandon it.
Multiple Monitors Support In Ubuntu
Linux provides three different types of support for dual-monitors. One is called “Join Displays”. With Join Displays, the two displays that you have connected would automatically get joined at the edges so that any display element can pass from one connected screen to another. In Join Displays, the two connected screens act as one big screen being extensions of each other.
The second display mode that Linux supports for dual-monitors is the “Mirror” mode, which is the simplest to understand. Both screens that are connected together mirror the same display content and mirror the same functions performed. Furthermore, both screens can support only the same orientation and resolution. By default when you connect two displays together, they will get connected in the Mirror mode with the highest common resolution picked between the two displays as the common resolution for both.
Finally, the third mode that Linux provides for dual-monitors is the “Single Display” mode. This is the easiest to configure and the most straightforward to understand. Essentially in this mode, one display remains dormant while the other is configured. In the Single Display mode, you can change the primary monitor.
If you want to connect more than two monitors in the multi-monitors mode, you can do so. However, only the Join Displays mode is available when using more than two displays together. Depending on the screens you want to have open and their relative position, you can drag and drop them to rearrange them as desired in Ubuntu.
How To Assign Different Wallpapers To Multiple Monitors
Let’s walk you through a simple tutorial of how to assign different wallpapers to multiple monitors using your Ubuntu system and other Linux distributions that use the GNOME desktop environment. This tutorial was especially important to discuss because the GNOME desktop provides limited support in this domain. You cannot assign different wallpapers to different screens when using multiple monitors without external open-source software.
Intro To HydraPaper
Among the third-party application software that allows changing wallpapers on multiple screens, HydraPaper is one that is free and efficient. This useful tool is a GTK based software application specifically designed to set up wallpapers on GNOME desktops. Dedicated to and built for GNOME, it is capable of providing powerful support.
HydraPaper is simple to understand. It lets you choose different wallpapers for two or more monitors or screens. You are not restricted to using wallpapers that come with Linux distros and can freely select any wallpaper from your disk.
By default, HydraPaper will display wallpapers located in the Pictures folder of your user account. However, you can add any folder to HydraPaper in which you have stored wallpapers. It is important to note that, before you go into a search frenzy like me and come close to thinking you have lost your sanity, HydraPaper will not display subfolders. Only the wallpapers located inside the root folder will be displayed.
How To Navigate HydraPaper
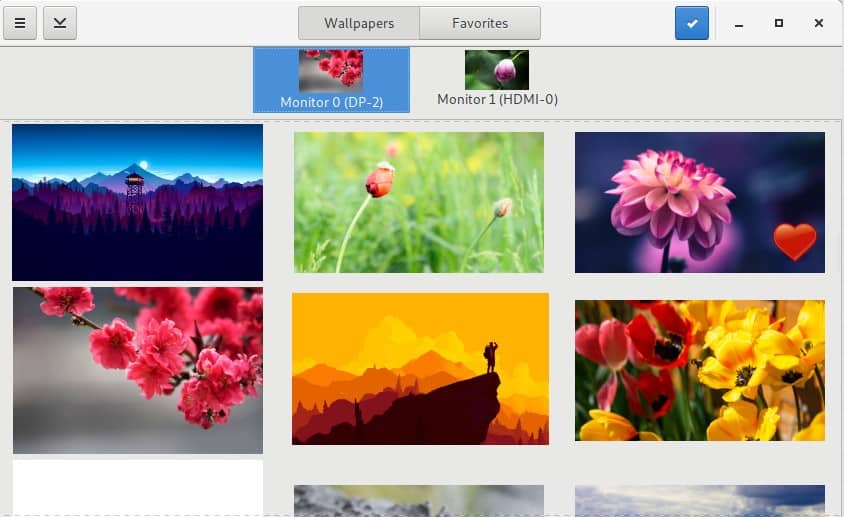
HydraPaper’s interface is easy to navigate. From the top panel of the HydraPaper application, you can access either all your wallpapers or the wallpapers you have tagged as favorites. In the main window, you can browse the wallpaper folders you have added and select a wallpaper. Connected displays are shown at the top of the HydraPaper main window and you can select the display for which you want to set the wallpaper.
HydraPaper settings do not have to be reconfigured after each boot. Once you set the wallpapers for external monitors, these will be saved and will appear whenever you restart your Linux device.
When it comes to customization, I’m a total geek. The first thing I did when I installed HydraPaper is to try out a wallpaper that spans both my connected screens. I did this using a high-resolution screen capture of a sunset view from Firewatch, a game that exceeds expectations in scenic aesthetics. I split the screen capture from the middle, creating two wallpapers that connect at the edges. The result was beautiful.
How To Install HydraPaper
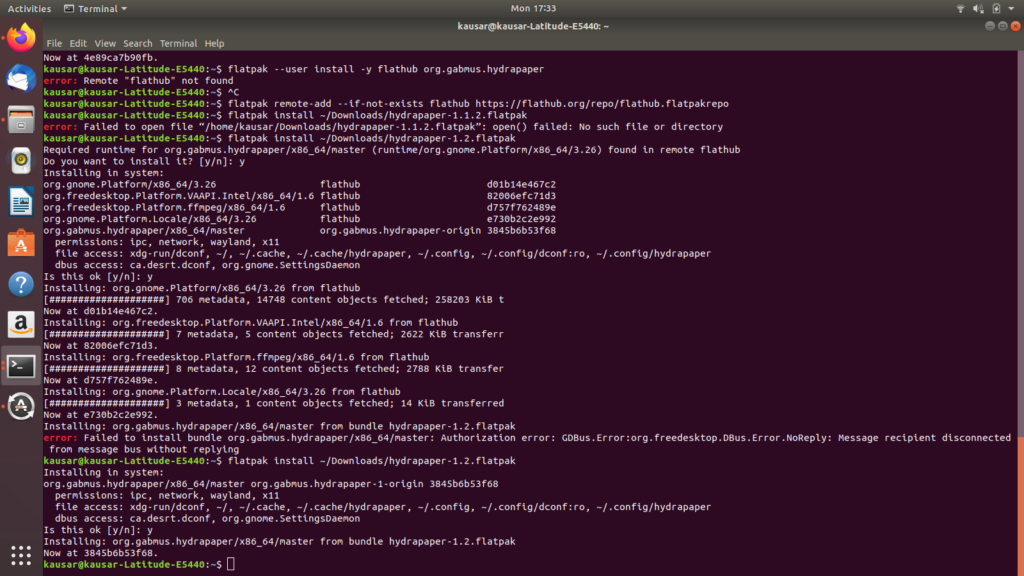
If you’ve been using your Linux distro for a while now, installing HydraPaper would seem easy as it takes just a few steps. Use the following commands to get HydraPaper up and running.
Install dependencies:
https://flathub.org/repo/flathub.flatpakrepo
Install HydraPaper:
Download HydraPaper from: https://github.com/GabMus/HydraPaper/releases
During installation, the terminal will ask for your authentication password on several occasions. Make sure to enter it within a few minutes of when the prompt appears.
To launch HydraPaper, just look for it in Applications and double-click on its icon. HydraPaper runs smoothly for more than two monitors as well. It is easy to install and straightforward to use, so there’s no reason we wouldn’t recommend it! However, you might notice some inconsistencies in your desktop wallpaper once you disconnect the external monitors – a slight glitch that can be ignored.
Now that you are familiar with the know-how of setting up wallpapers for multi-monitors, you can go ahead and begin customizing!


