When talking about distributed systems like above, we run into the problem of analytics and monitoring. Each node is generating a lot of information about its own health (CPU usage, memory, etc) and about application status along with what the users are trying to do. These details must be recorded in:
- The same order in which they are created,
- Seperated in terms of urgency (real-time analytics or batches of data), and most importantly,
- The mechanism with which they are collected must itself be a distributed and scalable, otherwise we are left with a single point of failure. Something the distributed system design was supposed to avoid.
Why Use Kafka?
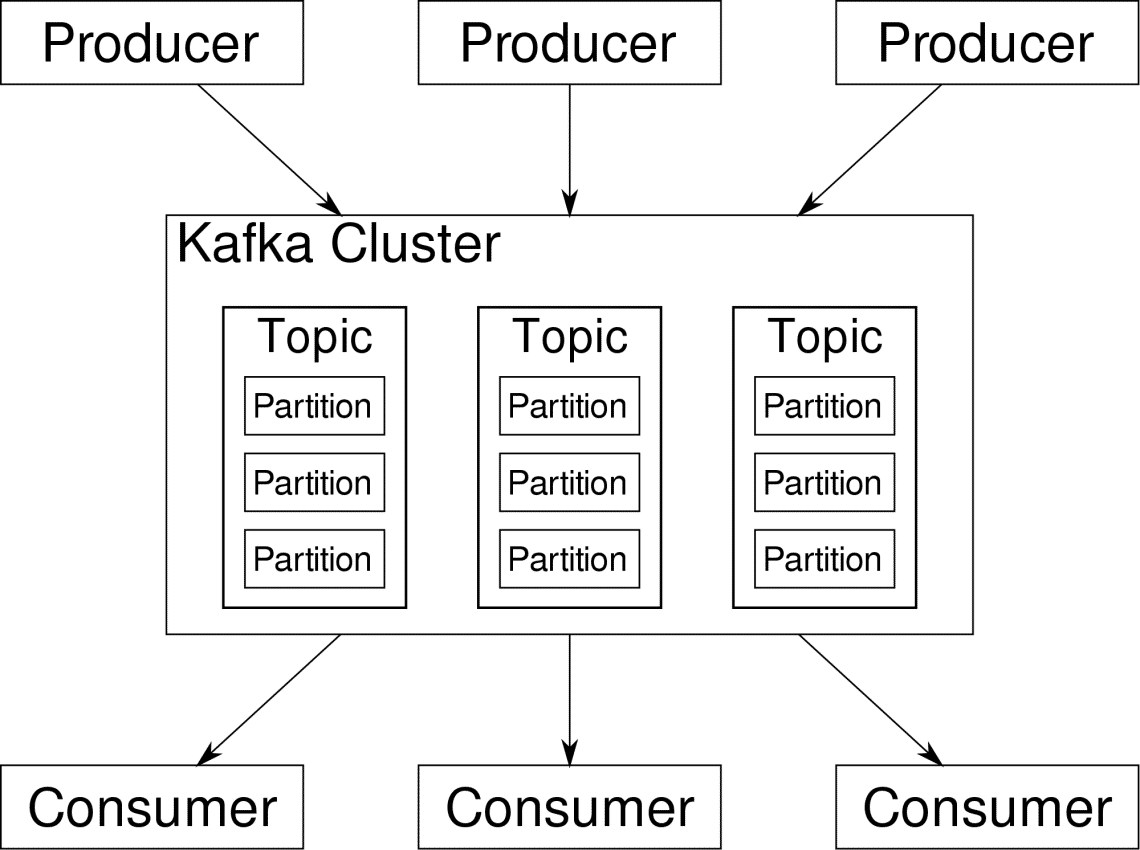
Apache Kafka is pitched as a Distributed Streaming Platform. In Kafka lingo, Producers continuously generate data (streams) and Consumers are responsible for processing, storing and analysing it. Kafka Brokers are responsible for ensuring that in a distributed scenario the data can reach from Producers to Consumers without any inconsistency. A set of Kafka brokers and another piece of software called zookeeper constitute a typical Kafka deployment.
The stream of data from many producers needs to be aggregated, partitioned and sent to multiple consumers, there’s a lot of shuffling involved. Avoiding inconsistency is not an easy task. This is why we need Kafka.

The scenarios where Kafka can be used is quite diverse. Anything from IOT devices to cluster of VMs to your own on-premise bare metal servers. Anywhere where a lot of ‘things’ simultaneously want your attention….That’s not very scientific is it? Well the Kafka architecture is a rabbit-hole of its own and deserves an independent treatment. Let’s first see a very surface level deployment of the software.
Using Docker Compose
In whatever imaginative way you decide to use Kafka, one thing is certain — You won’t be using it as a single instance. It is not meant to be used that way, and even if your distributed app needs only one instance (broker) for now, it will eventually grow and you need to make sure that Kafka can keep up.
Docker-compose is the perfect partner for this kind of scalability. Instead for running Kafka brokers on different VMs, we containerize it and leverage Docker Compose to automate the deployment and scaling. Docker containers are highly scalable on both single Docker hosts as well as across a cluster if we use Docker Swarm or Kubernetes. So it makes sense to leverage it to make Kafka scalable.
Let’s start with a single broker instance. Create a directory called apache-kafka and inside it create your docker-compose.yml.
$ cd apache-kafka
$ vim docker-compose.yml
The following contents are going to be put in your docker-compose.yml file:
services:
zookeeper:
image: wurstmeister/zookeeper
kafka:
image: wurstmeister/kafka
ports:
– "9092:9092"
environment:
KAFKA_ADVERTISED_HOST_NAME: localhost
KAFKA_ZOOKEEPER_CONNECT: zookeeper:2181
Once you have saved the above contents in your compose file, from the same directory run:
Okay, so what did we do here?
Understanding the Docker-Compose.yml
Compose will start two services as listed in the yml file. Let’s look at the file a bit closely. The first image is zookeeper which Kafka requires to keep track of various brokers, the network topology as well as synchronizing other information. Since both zookeeper and kafka services are going to be a part of the same bridge network (this is created when we run docker-compose up ) we don’t need to expose any ports. Kafka broker can talk to zookeeper and that’s all the communication zookeeper needs.
The second service is kafka itself and we are just running a single instance of it, that is to say one broker. Ideally, you would want to use multiple brokers in order to leverage the distributed architecture of Kafka. The service listens on port 9092 which is mapped onto the same port number on the Docker Host and that’s how the service communicates with the outside world.
The second service also has a couple of environment variables. First, is KAFKA_ADVERTISED_HOST_NAME set to localhost. This is the address at which Kafka is running, and where producers and consumers can find it. Once again, this should be the set to localhost but rather to the IP address or the hostname with this the servers can be reached in your network. Second is the hostname and port number of your zookeeper service. Since we named the zookeeper service…well, zookeeper that’s what the hostname is going to be, within docker bridge network we mentioned.
Running a simple message flow
In order for Kafka to start working, we need to create a topic within it. The producer clients can then publish streams of data (messages) to the said topic and consumers can read the said datastream, if they are subscribed to that particular topic.
To do this we need to start a interactive terminal with the Kafka container. List the containers to retrieve the kafka container’s name. For example, in this case our container is named apache-kafka_kafka_1
With kafka container’s name, we can now drop inside this container.
bash-4.4#
Open two such different terminals to use one as consumer and another producer.
Producer Side
In one of the prompts (the one you choose to be producer), enter the following commands:
bash-4.4# kafka-topics.sh –create –zookeeper zookeeper:2181 –replication-factor 1
–partitions 1 –topic test
## To start a producer that publishes datastream from standard input to kafka
bash-4.4# kafka-console-producer.sh –broker-list localhost:9092 –topic test
>
The producer is now ready to take input from keyboard and publish it.
Consumer Side
Move on the to the second terminal connected to your kafka container. The following command starts a consumer which feeds on test topic:
Back to Producer
You can now type messages in the new prompt and everytime you hit return the new line is printed in the consumer prompt. For example:
This message gets transmitted to the consumer, through Kafka, and you can see it printed at the consumer prompt.
Real-World Setups
You now have a rough picture of how Kafka setup works. For your own use case, you need to set a hostname which is not localhost, you need multiple such brokers to be a part of your kafka cluster and finally you need to set up consumer and producer clients.
Here are a few useful links:
I hope you have fun exploring Apache Kafka.


