In this article, I will show you how to install a minimal version of Debian 9 Stretch operating system. Let’s get started.
Downloading Debian 9 ISO Installation Media:
First go to the official page of Debian CD at https://www.debian.org/CD/http-ftp/#stable and you should see the following window. Click on the DVD links for your desired architecture as marked in the screenshot below. I am going to pick amd64 as I have 64-bit intel processor installed on my system.
Now scroll down a little bit and click on the first DVD as marked in the screenshot below.
Your download should start. It’s a very big file. So it should take a while.
Making a Bootable Media:
Now you have to make a bootable USB or DVD of Debian 9 Stretch ISO image that you just downloaded. To make bootable USB drive, you can use Rufus on Windows, which you can freely download from https://rufus.akeo.ie/
To make a bootable DVD, just burn the ISO image to a DVD and it should work.
Installing Debian 9 Minimal:
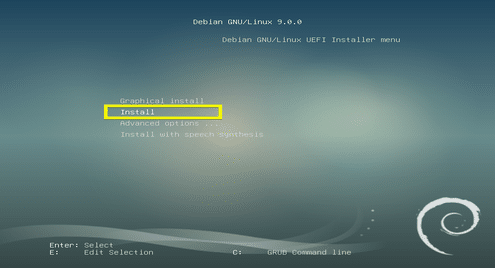
Now insert your bootable media on your computer and boot from it. You should see the following GRUB menu. Now select Install and press <Enter>.
Now select your language and press <Enter>.
Now select your Location and press <Enter>.
Now select your keyboard layout and press <Enter>.
The required files should be loaded from your bootable media.
Now type in your hostname and press <Enter>.
Type in your domain name if your computer is going to accessible from the public network or internet. If you don’t know what to put in here, just leave it empty and press <Enter>.
Now you can type in your root password. If you do set a root password, your ordinary user won’t be able to use sudo by default. If you leave it empty, then root user will be disabled by default.
If you’ve typed in your root password, then re-type it in here. Otherwise leave it empty and press <Enter>.
Now type in your full name and press <Enter>.
Now type in your login username and press <Enter>.
Type in your login user’s password and press <Enter>.
Re-type in your login user’s password and press <Enter>.
Now select your timezone and press <Enter>.
If you want to wipe your entire hard drive and install Debian 9, then you can select the first option Guided – use entire disk. But I will show you Manual partitioning as this gives you much more control over how you use your disks and this is where most people new to Linux gets stuck.
One you select Manual, you should see something like this. If you don’t have any partition table, just select your hard drive and press <Enter>.
Now select <Yes> and press <Enter>.
A new partition table should be created. Now to create a new partition select the FREE SPACE and press <Enter>.
Now select Create a new partition and press <Enter>.
Now type in the size of your partition. The first partition will be the EFI System Partition or ESP. I am going to put 512 MB of disk space for the ESP. If you’re not using an UEFI compatible motherboard or you have UEFI disabled, then you don’t have to create this partition.
Now select Beginning and press <Enter>.
Now select the marked section as shown in the screenshot below and press <Enter> to change the partition type.
Now select EFI System Partition and press <Enter>.
Now select Done setting up the partition and press <Enter>.
The ESP partition should be created.
Now you have to create the Root(/) partition. Select the FREE SPACE again and press <Enter>.
Now select Create a new partition and press <Enter>.
Now type in the partition size for the Root(/) partition. By default, the maximum partition size is selected. Now press <Enter>.
Now make sure the Mount point is / and select Done setting up the partition and press <Enter>.
Finally, it should look something like this.
Now select Finish partitioning and write changes to disk and press <Enter>.
I prefer file based swap so I will be adding swap space later. Select <No> and press <Enter>.
Now select <Yes> and press <Enter> to save the changes to the disk.
The installation should start.
Select <No> and press <Enter>.
As we are using Debian DVD image for the installation, the installation should be faster if we don’t use network mirror. We can update the system later if we wish to. So I personally select <No>. Now press <Enter>.
If you don’t want to participate in the package usage survey, then select <No> and press <Enter>.
This is the most important step of this article. As we are interested in installing minimal version of Debian 9, we have to install only the essential softwares required to run the operating system. By default, a lot of the software packages are selected.
Press <Space> to deselect all the selected softwares and only keep Standard system utilities selected. Now press <Enter>.
The installation should continue.
Once the installation is complete, select <Continue> and press <Enter>.
Now you should see the following GRUB menu. Select Debian GNU/Linux and press <Enter>.
The minimal Debian 9 Stretch operating system you just installed should start. Type in your login username and password and press <Enter>.
You should be logged in.
As you can see, only 761 MB of disk space is used.
And 66 MB of RAM is used.
So that’s how you install the minimal version of Debian 9 Stretch. Thanks for reading this article.


