How to use git in Emacs
Download and config
To get started using git in Emacs for version control, choose and install a chosen solution. In this article you will see the Magit mode. Many users have praised magit for it’s design. In fact, it has the power to teach you Git because it shows you the options when they are available. Later you will see this in action, for now let’s install it. The package is available from MELPA, though advanced users may download the source.
You can Download from MELPA or add use-package to have it installed by the setup script. To configure, the simplest is to add a global key-binding as per the below code.
:config
(global-set-key (kbd "C-c m") ‘magit-status))
The key-chord is up to you but most users have C-c m for magit, if C-c g for Git is more logical to you, go for it. You can add many more but the magit interface is so powerful you will probably want to use it as is.
Running magit
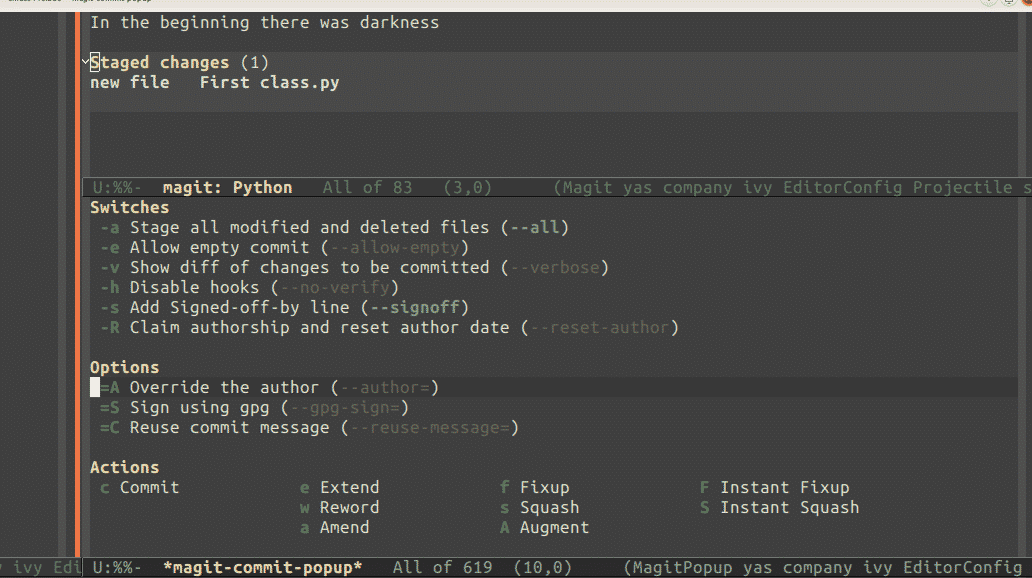
Once magit is installed, when you run it, it shows a nice menu to help you along. The best way to start is to write your first file in a directory that will be your repository. Emacs is brilliant here, in the sense that you can type the whole path of your file, including the file. Emacs will ask to create the directories for you. Magit is also smart in that if you have just a few files in a directory and you try to add files to a repository, it will ask if it should create a git repository. Answer ‘yes’ and magit will run git init in your directory.

After that is done, it is your turn to choose what you want to add to your repository. The most common is that you add all, since you created the directory for this purpose. Later on you will make sure to ignore some files. Now, to see some effects, you need to create new files and edit existing ones. Start by writing a README.md file. Put a few sentences in it so people know what the repository is for.
Staging
When you have some changes, they need to be prepared in git. This is called staging and makes it possible to check what is new before you commit it. In the magit interface, you have all files listed under a heading that reflects their current status. The sections will show depending on if you have any files there. The states are Unstaged, Staged, Commited, Unmerged, and Merged which shows the main stages for your files. The brilliance of magit shines through here; when you have opened the interface you can type ‘s’ to stage a file, ‘S’ to stage all files.

If you feel a little lost about what actions you have available, just hit ‘?’, the question mark. All commands and their respective key-bindings show up and you can choose accordingly. Staging happens on the current branch, this will be main if you just created the repository. In reality, you will usually work on a branch.
Branching
Branches are used to create new code while still allowing the main code to be downloaded and tested. When you want to create a new feature or fix a problem, you create a branch. In magit, you create branch from the interface by pressing ‘b’. After that you can choose ‘n’ to create but not start working on it’s code. The better and more common alternative is to choose ‘c’. When you have chosen the branch name, magit creates the branch and checks it for you. You are now changing the branch and can do your coding in piece.
Commit
A commit is when you put the latest update in the current branch. For the most of your time developing software, you will be working on a branch. You do this so you can test your own code on your own machine before you add it to the main tree. The rest of the team will see your code once you merge it. Which branch you merge it with will depend on the team you are working with and the task you have just solved.

In magit you reach the commit function by opening status and choosing ‘c’. You can choose a lot of options but most of the time you will just repeat ‘c’ again to commit for real. Note that magit will not allow a commit without a message, so you will be presented with a place to put your text and then you can commit with ‘C-c, C-c’.
Merge branches
When you have a nice branch that works the way you want, or looks good, you need to merge it with the main and then run tests. When that is done you need to push it to the remote repository. In magit, you have all this at your fingertips. It is easiest to checkout the branch you want to merge to before you merge. In the magit status window, you start by choosing merge, most times you will merge simply with the ‘m’ choice but you can also merge into.

Other options that are available includes to absorb, merge into and merge. The absorb is for when you have too many branches and you want to combine them into one. These options are something you need to work through a few times to see when it is appropriate to use them.
Remote
If you are using GitHub, you need to create your project on GitHub before you start. After the first file is on GitHub, you can do most things from Magit and Emacs. To clone any project of any git service, use M-x magit-clone. When you start it, you will be prompted to put in the remote repository. Paste in the URL, git or https both works well. Now you have the entire project stored locally and you can start changing it. To do this, you want to create a new branch. With magit, you start a new branch in the status screen by choosing ‘b’ and then ‘n’.
Choose where to start from and give a name to your new branch. Once the branch is created, you can change code, add files, remove files in the directory. Any changes you make to existing files will be tracked, new files you will have to add yourself.
Join existing projects
The most rewarding part of coding, especially in free and open source, is to contribute to other projects. This can also help you get a job as a developer, when potential employers see that you have contributed to a project, they know that you have experience. Many projects use Git for version control so with Magit in your toolkit you are golden. To contribute, you have a few things to do before you can get started. First, clone the repository. Second, make an upstream branch to work with. Another important thing to consider is how the project you are working with documents their code and commits. They usually have a style guide you need to consult before you commit. Now that you are prepared to contribute you need to create a branch, actually many branches. Let me clarify: you create a branch for each task, this is so that a pull request can be connected to i.e a trouble report. The branch naming is also important, each project has their own style. Where you branch from will also differ depending on the task. A patch will be a branch from the stable branch and new features will hang off the development branch. This way, the whole team can test in the right order. First, make the main branch stable, then add new features. Rinse and repeat.
Logging
When you feel that the code has steered of course, you will need to use the log. The git log will show the reference hash and the commit message by default, If the commit messages have been well written, this will be enough. However, many times they are not. For more advanced cases you can also view more information. You can choose to show the users, the branches and even get a graphical view of the branching. You also have the possibility to show the entire patch from the log, this will be a very long file though. The point is, you have many options to find what you are looking for.
Conclusion
Git has been around for a long time. Developed by Linus Torvalds it is made to work for really big projects while you have use of it from your very first project. When you start actual software projects, you will have to use some system to keep track of changes to the code. Git is one of the most common right now, so try it out.


