Docker Machine has drivers for different virtualization platforms such as VMware Fusion, VirtualBox, Hyper-V, and many cloud services such as Amazon EC2, Google Cloud, Digital Ocean etc. by default. But it does not have a VMware Workstation Pro driver installed by default.
In this article, I am going to show you how to install Docker Machine, install VMware Workstation Pro driver for Docker Machine and use Docker Machine with VMware Workstation Pro. I will be using Ubuntu 18.04 LTS for the demonstration. But, any modern Linux distribution should work just fine. So, let’s get started.
Prerequisites:
In order to successfully follow this article, you must have,
- A computer with any modern Linux distribution installed.
- Docker installed on your computer.
- VMware Workstation Pro 14 or above installed on your computer.
- curl installed on your computer.
linuxhint.com has many articles written on these topics. I recommend you take a look at them if you need any help.
Installing Docker Machine:
Before you install Docker Machine, make sure that you have VMware Workstation Pro 14 or above and Docker installed on your computer.
As you can see, I have VMware Workstation Pro 15 and Docker 18.09 installed on my Ubuntu 18.04 LTS machine.

Now, install Docker Machine on your Linux computer with the following command:
curl -L $base/docker-machine-$(uname -s)-$(uname -m) >/tmp/docker-machine &&
sudo install /tmp/docker-machine /usr/local/bin/docker-machine

As you can see, the Docker Machine binary is being downloaded. It may take a while to complete.

Docker Machine should be downloaded and installed.

Now, check whether Docker Machine is working with the following command:
As you can see, Docker Machine is working properly.

You should install the Docker Machine bash auto completion scripts as well. To do that, run the following command:
for i in docker-machine-prompt.bash docker-machine-wrapper.bash docker-machine.bash
do
sudo wget "$base/contrib/completion/bash/${i}" -P /etc/bash_completion.d
done

The bash auto completion scripts for Docker Machine should be installed.

Now, close the terminal and open it again. Then, try to see if Docker Machine auto completion works.
As you can see, auto completion is working very well.

Installing VMware Workstation Driver for Docker Machine:
There is no VMware Workstation Pro driver for Docker Machine by default. But, you can install the VMware Workstation Driver from machine-drivers/docker-machine-driver-vmware GitHub repository and use it with Docker Machine.
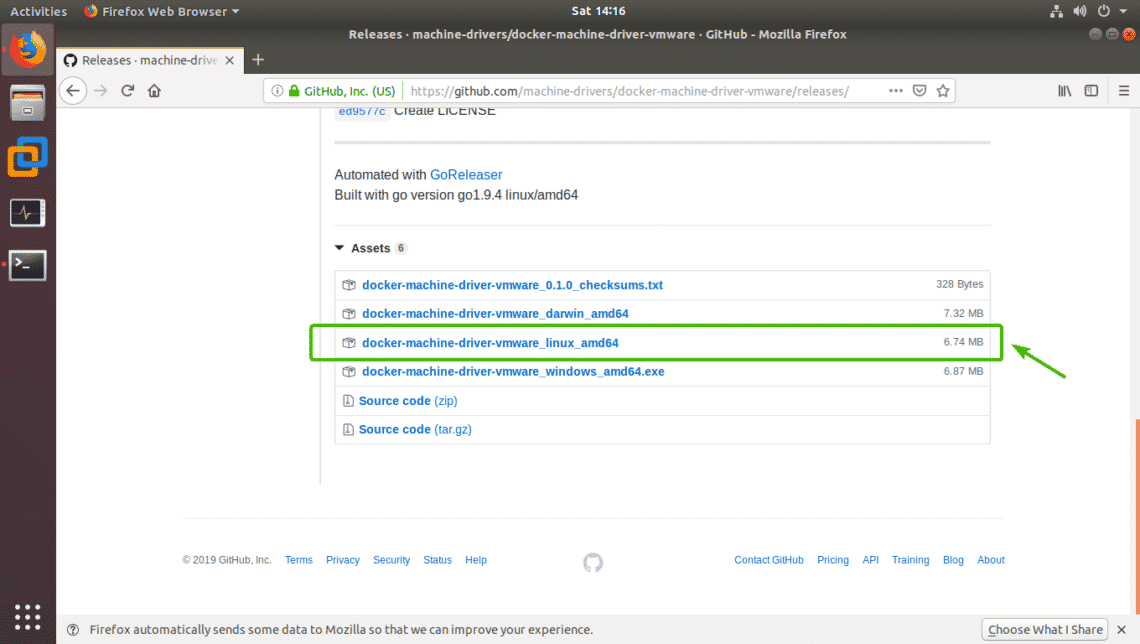
First, visit the releases page of the GitHub repository machine-drivers/docker-machine-driver-vmware. Once the page loads, scroll down a little bit and find the link docker-machine-driver-vmware_linux_amd64 as marked in the screenshot below. Now, click on it.
Your browser should prompt you to save the file. Click on Save File.

The file should be downloaded.

Now, open up a Terminal and navigate to the ~/Downloads directory with the following command:

The VMware driver file you just downloaded should be here.

Now, you have to make the file executable with the following command:

As you can see, the driver file is now executable.

Now, you have to rename the driver file to docker-machine-driver-vmware. To do that, run the following command:

The driver file should be renamed.

Now, you have to move the driver file to a directory that is in the PATH variable. Usually, /bin or /usr/bin directory is good enough. But, if you want to find out what other directory you can put it in, run the following command:
As you can see, /usr/bin and /bin directories are in the PATH.
To move the driver file to /usr/bin directory, run the following command:

The driver should be installed. Now, you can use it with Docker Machine.
Creating a Docker Machine:
Now, you can create a new Docker machine with the following command:

Here, default is the name of the Docker machine. You can call it anything you want.
As you are creating a Docker machine for the first time, the Boot2Docker ISO image will be downloaded. It may take a while to complete.

A new Docker machine default should be created.

From now on, it won’t take long to create new Docker machines as the Boot2Docker ISO image will be cached.
Listing Available Docker Machines:
You can list all the Docker machines you’ve created with the following command:
As you can see, the default Docker machine is running. It’s using the vmware driver and the Docker machine is running Docker version 18.09.3 at the time of this writing.

Printing the IP Address of Docker Machines:
You need the IP address of the Docker machine when you want to connect to some services running on the containers hosted on that particular Docker machine.
You can print only the IP address of the Docker machine you want.
Let’s say, you want to find out the IP address of the Docker machine default. To do that, run the following command:
The IP address should be printed on the screen as shown below.

Using Docker Machines:
To connect to your Docker machine default, run the following command:

As you can see, I can run the Docker commands as usual.

Once you’ve done your work, you may want to switch over to another Docker machine (let’s say docker1). To do that, you can run the following command:

Once you’re done with all your work, you may want to go back to your local Docker environment. To do that, just run the following command:

Starting and Stopping Docker Machines:
If you want, you can stop a running Docker machine (let’s say default) as follows:

As you can see, the default Docker machine is not running anymore.

If you want to start the Docker machine default again, then run the following command:

As you can see, the Docker machine default is running again.

Removing Docker Machines:
If you don’t need any Docker machine anymore, you can just remove it.
For example, let’s say, you want to remove the Docker machine docker3. To do that, run the following command:
Now, press y and then press <Enter> to continue.

The Docker machine docker3 should be removed.

So, that’s how you setup and use Docker Machine with VMware Workstation Pro. Thanks for reading this article.
